Sunday, March 31, 2013

Butterick 5891 Katherine Tilton Top and Jacket

Just a warning--this post has quite a few pictures.

Butterick Patterns recently released a couple of patterns designed by Katherine Tilton, sister of Marcy Tilton.  (I'm still a bit curious about why she moved from Vogue to Butterick--anyone have any ideas?)  One pattern that really hit my "need to make it now" button was B5891, a very interesting pattern for a top/vest and a jacket.  I purchased it right away (well, as soon as the Butterick website put them on sale).


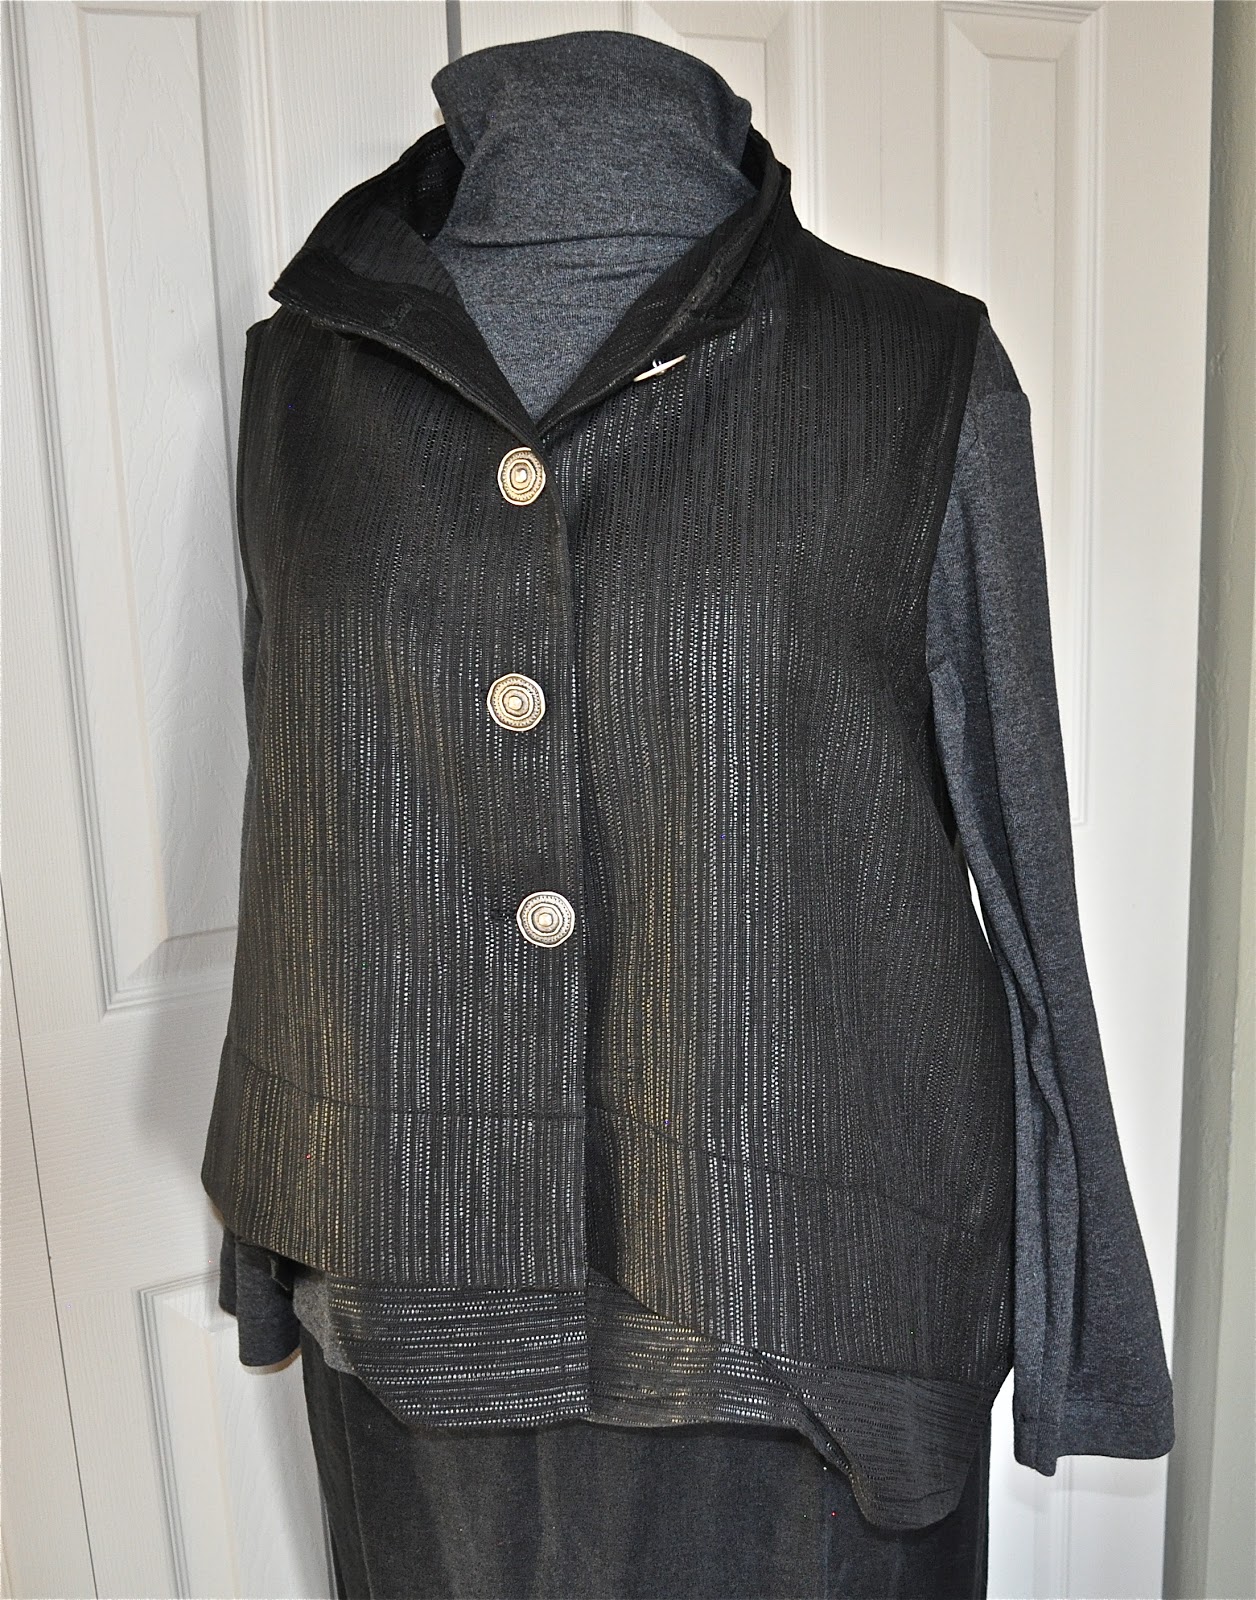
I decided to try the vest first.  The pattern actually describes this views A/B as a "top," but I call it a vest because I would only wear it over another garment with sleeves.  My upper arms do not make public appearances any more.


 I chose an odd fabric I had sitting on the shelves that I got from Vogue Fabrics about three years ago.  It was labeled as a poly/rayon blend striped jacquard.  I thought it was kind of weird and wasn't sure what to do with it, so it sat around for awhile.  I figured it would be good to use for testing this pattern, since I wouldn't mind if it became a wadder.


This is a very interesting pattern.  It is rather cumbersome to cut out because there are 15 pattern pieces and they are almost all cut with the fabric single layer.  I think it is essential to keep the pattern pieces attached to the cut fabric until the last possible moment and to transfer all the markings to the fabric.  It is very easy to get the pieces mixed up or get them turned around.  It would be a nightmare if your fabric looked the same on both front and back.  Luckily, my fabric had some sort of interfacing pre-fused to it, so it was quite clear which was the wrong side.  This did become an issue at one point, however, because the inside of the double collar shows the wrong side of the inner collar when you wear the neck unbuttoned.  As a result, I chose to self-line the inner collar so it would look nicer when open.


Here's a view with the collar buttoned up


And the back.  I tried to play with the texture of the fabric in the peplum pieces.


The front peplum pieces have tucks sewn in, which adds an interesting contrast to the otherwise fairly straight structure of the garment.


Overall, I'm basically happy with the resulting vest.  My fabric is probably a little to stiff for this pattern, so it may not be the most flattering look on me.  The vest is narrow through the shoulders, but increases greatly in width at the hipline--my stiffer fabric kind of accentuates that.  Also, if I ever make it again, I will cut the armscyes a little lower.  They are cut high under the armpit, which is a good feature if you are going to wear it alone as a top (no bra flashing when you raise your arms), but makes it a little tight with a shirt on underneath.  

While this is not a difficult garment to stitch together, I must say that the pattern directions were a little vague in some areas and also could have included a little more info on finishing details for a better resulting garment.  A beginning level sewist might have some difficulties figuring out what the instructions mean for you to do in certain places, but a little playing with the pieces reveals how it all comes together.

Shortly after finishing the vest, I just had to make the jacket as well.  For this I chose a raw silk tweed in natural, black and white.  I previously had washed the fabric, so it was a little more drapey than perhaps this view needs.  The collar is a really neat feature and I'm not sure it comes across as nice as it could with another fabric with more body to it.  However, I must say, I LOVE this jacket.  The collar is really fun to play with, and can be draped in different ways.  There is a small button hidden inside the left right collar that will hold the right left side of the collar inside, like here:


Or, you can leave that unbuttoned for a completely different look:


As I was rather convinced that this wasn't going to turn out well, I didn't bother to change the serger thread to a color that would blend into the fabric, so you can see the serging on the collar edges as it drapes.  When I decided I really like this jacket, I was kind of pissed at myself for being lazy.  But, actually, the more I look at it, the more I kind of like the contrast of the black serging.  The nature of the tweed is such that it hides some of the design features, such as the front shoulder princess seams, so the bit of contrast seems to add something to me.

Here's the back.  Rather simple, but it really hangs nicely.


It also has side seam pockets.


I am really very happy with this jacket.  It's a fun look, adaptable to lots of different fabrics for different looks.  Furthermore, this is much simpler and definitely quicker to put together than the top/vest view of the pattern.  I see at least one (maybe two) more of these in my future!


Monday, March 4, 2013

Vogue 8499 Skirt Version 2

Although it has taken me forever to write up a post about it, I made a second version of the Vogue 8499 Marcy Tilton skirt in early January.  This time I used a  linen/cotton blend fabric in black with cream dots woven in to create a striped effect (acquired from EmmaOneSock).  I love this second version even more than the first!  (The top is another StyleArc Debra Zebra--it fits better on me than it looks on the dressform)


The dots/stripes were woven across the grain of the fabric, so I cut the main pieces of the skirt on the cross grain for vertical stripes and then cut the pockets with the grain for a little contrast and interest.


For the pocket closures, I used plain black zippers with silver metallic teeth that I found at the local JoAnn's and added some simple silver zipper pulls that I had in stash.  I again made a shallower sub-pocket inside one of the larger outer pockets to be more accessible for my work keys and such, but again forgot to take a photo of that part.


This skirt is so fun--both to sew and to wear.  Although it has a pretty distinctive look to it, I think there might be room for at least one more in my closet if the right fabric comes along or pops off the shelves of the fabric collection.


While searching out the photos of this skirt, I also came across photos of one of my last projects in 2012.  I finally got around to making up the E-Shrug, a downloaded pattern from The SewingWorkshop.  I made the lengthened version with long sleeves for a nice sweatery waterfall cardigan.  The fabric is another colorway of the poly/cotton sweater knit from FabricMart that I used to make Vogue 8854 last fall.


I did get some time in the sewing room this last weekend--hopefully I can get some photos taken in the next day or so to post.


Sunday, January 6, 2013

Vogue 8499 Skirt and StyleArc Debra Zebra Top

Well, I seem to be getting a slow start to the New Year.  I just can't decide what I want to work on and where I want to focus.  Also, I have several projects I completed during the last couple of months of 2012 which I still want to blog about, but haven't gotten to.  Here's one.

I've owned a copy of Vogue 8499 since it was issued (the copyright year on the envelope is 2008).  This is a skirt and pant pattern designed by Marcy Tilton.


I originally purchased the pattern because I loved the lines of the skirt.  I was not so thrilled with the pants at the time.  True to my nature, I tossed the pattern on the pile of other purchased-but-never-made-up patterns and allowed it to languish for several years.  Then I kept seeing other sewists making up fabulous versions of the pants and I wanted to jump on the bandwagon of making these "cute with an edge" pants.  After two failed attempts, I had to admit that the style of these pants just do not mesh with my personal body structure, no matter how many alterations/adaptations I made.  But I kept thinking that I still wanted to try the skirt.  So I put the pattern back onto the pile of oblivion.

Then earlier this fall I purchased a fabric from Marcy Tilton that I thought wanted to be a skirt. Rummaging through various patterns options, I came across Vogue 8499 and thought "aha!" finally the perfect opportunity to try this pattern.  Of course, I didn't want to cut my lovely MT fabric without testing the pattern first, so I pulled out a piece I had acquired last summer at JoAnn's.  The fabric is a linen/rayon blend in grey with black circle/swirls printed on it.  My response to the pattern test was "Oh my gosh, what took me so long!!??"  I love this skirt!  It is very comfortable and is so fun to wear!


Even though I tend to wear my skirts long in length, I did shorten this pattern about 1.25 inches (but I have short legs).  If you haven't made this pattern before, be aware that, as a result of the skirt design and technique for  stitching the skirt panels together, the hems of each piece (center front, 2 side fronts and the back) are finished prior to stitching the lengthwise seams together.  Thus, you must determine your preferred finished skirt length at the outset of the process--you cannot leave that decision to the last step of your sewing.  I shortened the pattern pieces at a point between the top of the pockets and the waist to avoid messing with the pocket pieces.  I also omitted the recommended zipper closure at the back waist and used just an elastic waistband.  I added a slight amount to each side of the main body pieces from about the top of the pockets up to the waist to make sure there was enough width to pull the skirt up over my hips.  It worked well.


I didn't have any appropriate zippers in stash to finish the tops of the pockets in the manner recommended by the pattern (and I was not leaving the house that weekend just to buy notions for a test garment!), so I added a fold over facing (with interfacing for support) to the top of the pocket pieces and made a buttonhole.  I actually really like this closure option.  I also added a shorter "sub pocket" inside one of the outer pockets that is only about 4 inches deep so that I can carry things like my keys at work without digging all the way to the floor each time I want to use them.  I forgot to take a photo of that.


In the photos, I have this skirt paired with a StyleArc Debra Zebra Top in a dark grey rayon/lycra knit.  This funnel-neck top is wonderful both standing on its own as a top and as a layering piece under other items.  I have made several of these now in different basic colors and I'm pretty sure I will be making more.  Another winner by StyleArc!  If I recall correctly, the only alteration I made to this top pattern was my standard adding width to the sleeve for my big upper arms.


I have another V8499 skirt in progress as I am writing this post.  In the end, I decided to hold off on using my MT fabric that I originally had in mind for this project because I thought it might be a little too lightweight.  I need to ponder it more.  So I pulled a different piece from the fabric shelves.  I'm about halfway through the sewing process and am at that point where I'm wondering just exactly where my brain was when I thought this fabric would be fabulous in this skirt.  But I'm pushing through to get to the "oh yes, I was right about this pairing" stage.  Hopefully I find it.


Wednesday, December 26, 2012

Thank You Gwen!

So, the other day I discovered that the lovely Gwen of the blog All My Seams included me in her nominations for the Lovely Blog/Very Inspiring Blog Awards.  I am deeply flattered by, and appreciative of, her recognition.  Gwen does beautiful work and, if you subscribe to Threads Magazine or can get your hands on one, the most recent issue that just came out (for February?) has a "Readers' Closet" article which features a gorgeous jacket made by Gwen.  It is absolutely a "must see."


The Rules of the Award provide as follows:

1.  Thank the person who nominated you.  (See above)
2.  Add The One Lovely Blog Award/Very Inspiring Blogger Award to your post.  (also see above)
3.  Share 3 things about yourself.
4.  Pass the award on to 10 nominees.
5.  Include this set of rules.
6.  Inform your nominees by posting a comment on their blogs.

Three things about myself?  Well, let's see:

1.  I love cheese.  (which is really is an understatement of my feelings about cheese.)  I am fairly indiscriminate in the variety of cheeses I am more than obliging to consume, but I would have to say that my favorite is Brie.  Although a true Brie connoisseur would probably consider me a barbarian because I much prefer my Brie to be well on its way down the path to over-ripe.  As in, you can smell it from the next room.  Which reminds me of a line in a Family Guy rerun I recently watched on TV.  Something was making a horrendous smell and one character asked what it could be.  The character Brian (who is a dog, if you don't watch the show) responded that he wasn't sure, but thought it was "either really bad meat or really good cheese."  Hilarious.

2.  I got my undergraduate degree (a B.F.A.) from the Department of Drama/Dance at the University of Montana.  My emphasis was in costume construction.  I had no desire to be a costume designer, but I absolutely loved the process of taking the designer's two-dimensional rendering of a character in costume and making it come alive in three dimensions.  And I got to learn a lot about flat-patterning and draping.

3.  For a nearly complete turn-around after getting my B.F.A., I went on to law school.  Rather than go into private practice as an attorney, however, I have spent my years since law school working as a law clerk for three different judges.  I have been very lucky to have fallen into this field of work and to have been allowed to it for so many years.  The people I have had the opportunity to work for and with (both currently and in the past) are truly amazing.

I know this award has been making the rounds of the internet for the last few weeks, so I'm sure all of the bloggers that I love to follow already have been nominated by someone else.  If you've previously been nominated, or if you don't care to participate in awards, please feel free to disregard this.  Actually, it is quite difficult to narrow my list to only ten bloggers, but these are the ones that come to mind first.

Each of these sewists has a developed personal aesthetic which I really admire, even though it doesn't always coincide with mine.  These sewists' blogs exude the passion and skill with which they approach the art and craft of sewing.  I also am appreciative of the generous way in which they share their knowledge and love of sewing with others.  Several of these bloggers are not currently active on their blogs, but it is well worth going back to read their previous posts (over and over again)--I can only hope that they eventually decide to become actively involved in the internet sewing community again some day.

1.  Shams of Communing with Fabric.  I was so flattered and excited (I think I even did a little dance around the room) when Shams became my first follower after I set up my blog.

2.  Margy of A Fool for Fabric

3.  JillyBe of JillyBeJoyful

4.  Robyn (BlueMooney) of UnZipped

5.  Peg of Deconstruct, Alter, Create

6.  TerriK of SewTerri

7.  Ann of Stitch Me Up

8.  Shannon of HungryZombieCouture

9.  Myrna of MyrnaGiesbrecht

10.  And, of course, the incomparable Carolyn of Diary of a Sewing Fanatic


To those who celebrate the occasion, I hope you all had a wonderful Christmas.  To everyone, regardless of the special occasion you may (or may not) celebrate, I send thoughts of peace and good will unto others which we should all have in mind no matter what time of year it is.  And may the New Year bring us all wondrous and beautiful things!

Friday, November 23, 2012

Vogue 8854

Wow, it's not often I purchase a new pattern and actually get it sewn up in the same season in which it was released!  This is one of the Very Easy Vogue Patterns issued this late fall from VoguePatterns.  I've been looking for a couple hoodie patterns lately and I thought this one had interesting design lines with the offset placket opening.


For my test of the pattern, I selected a sweater knit recently purchased from FabricMart.  It was described as a poly/cotton blend heathered stripe knit in the colors of sable, cream and dark brown.  It is an interesting knit, with one side showing a flat knit with the stripes clearly delineated and the other side appearing more of a boucle texture.  I chose the boucle textured side as the "right" side for my project.  I've already thrown out the scraps of the fabric used for this top before thinking to snap a photo of the two sides, but here it is in another colorway where you can kind of see the difference between the two sides:


The size chart on the pattern envelope put me in a size XL (20-22) and the finished garment measurements printed on the pattern tissue, in addition to some flat-pattern measuring on my part, confirmed that XL was the size I wanted to make.  I didn't even need to make my standard increase at the biceps on the sleeve!  But I did shorten the sleeve pattern by about 1.5 inches.

I really wanted to make the version with the hood (after all, that's why I bought the pattern!), but my test fabric was only 2 yards and I just couldn't squeeze the hood piece on what I had. So I had to go with the collar version and the shorter back length of View B, with the front pocket.  By the time I finished the garment, however, I was more than happy that I had to use the collar instead of hood--this collar is fabulous!  My sweater knit was fairly substantial to begin with and I interfaced the collar piece, as the pattern instructs.  Thus, the resulting collar has a nice ability to stand up in a shapely way, but is not so stiff that it looks board-like.  It also is soft and malleable enough to be able to fold it down if I wish.  It's really fun to play with for different looks!  Also, the collar pattern piece is just a big rectangle, so it would be very simple to cut the collar to be a shorter height if you wanted.

Here's the finished top:


The photo looks like I got a little over-zealous with the iron, but this isn't noticeable on the garment in real life.

A closer look:


This pattern is quite simple to put together and did not take a lot of time to construct.  The most time consuming part is probably creating the front placket opening.  And, while the pattern instructions are actually quite good and seem reasonably clear, I did veer from their suggested procedure in two aspects.  The first variation I did was when making the front placket.  The instructions tell you to sew the two fronts together with a seam which goes from the hem up to the bottom of the placket.  Then you work on each of the two sides of the placket to finish the front.  I thought this sounded like kind of a PITA to have to work on one side of the placket while the other half of the front was attached and dangling off to the side.  So, after stay-stitching each inner corner of the plackets, I constructed them separately, then stitched and finished the center front seam.  This worked just fine for me and probably involved much less swearing.

The other spot where I veered from the instructions as written was with the sleeves.  The pattern instructs to stitch the body side seams and the underarm sleeve seams separately and then do a traditional set-in sleeve, stitched in the round.  I totally understood why the pattern instructs to set the sleeve this way--this is not a dropped shoulder, the armscye sits at the normal shoulder point and, therefore, the sleeve has a relatively high cap.  When inserting a regular sleeve with a normal-to-high sleeve cap, it usually is easier (and you typically get much better results) if you set in the sleeve more traditionally.  However, knowing that I was working with a knit (which can be a little more forgiving when easing), I chose to put the sleeve in flat after I sewed the shoulder seams and then stitch the underarm and side body seam in one long go from bottom hem to sleeve hem.  It worked fine.

An even closer look at the collar with button closure:


I used an elastic hair tie for the button loop.

All in all, I think this is a great pattern.  Pretty simple and quick to put together, and the instructions are pretty decent.  The fit is good--I can wear a long-sleeved T-shirt or turtleneck underneath it, but nothing heavier than that.  I like that it has a regular sleeve/shoulder, rather than a dropped shoulder line.  The collar is really fun to wear and feels cozy, especially if there's a little wind in the air.  I think it turned out really cute and I will be making at least one more before I put the pattern away (gotta have that hood!!).


Sunday, November 11, 2012

Taking the "U" out of a couple UFOs

The dreaded UFO.  The UnFinished Object.  I try not to have them hanging around, but sometimes a project just loses its steam or hits a wall, and I put it away for a bit.  And then they sit in the dark recesses of the sewing closet, quietly laying a big guilt trip on me.

So, last week I pulled out two UFOs and got them finished up.  The first project was cut out last May and I'm not sure why I never stitched it up, because I was really looking forward to having the top to wear.  I suspect that I didn't have black thread on the serger at the time, so I went to another project that used whatever color was on the serger and then the weather warmed up too much for a long-sleeved shirt.  Hmm.  Anyway, this is another Sewing Workshop Liberty Shirt as a knit top.  The fabric is a wonderful black and white print rayon/lycra knit from EmmaOneSock.  I love this pattern and I love this top!


Next, I moved on to a jacket that has been in the works for at least a year and a half, if not more.  The background--About 18 years ago, I made myself a jacket out of OOP Vogue 2461, a Vogue American Designer pattern by Calvin Klein (copyright of 1990).  I used a beautiful dark green tone-on-tone printed poly raincoat fabric and lined it with an acetate/rayon blend faille.  That jacket turned out to be a workhorse for me--it was light enough to wear through both spring and autumn, but had enough heft to be warm enough for much of the winter season except for the coldest of days, even here in Montana.  Sadly, several years ago it was to the point of showing so much wear--the folds of the sleeve pleats and edges of the cuffs were wearing through--that I knew I needed to replace it.  Basically, I wanted the same coat again.  Luckily, my Mom still had the original pattern that I used, so I stole borrowed the pattern from her one time while over visiting.  Then it sat for a year while I tried to find the perfect fabric.

Eventually, I found a lovely black crinkled texture poly from Marcy Tilton that I just loved, and it even was on sale!  Then I puzzled over what to use as a lining.  I really liked the rayon/acetate faille I had used previously, but that fabric has become extremely difficult to locate anymore.  I finally found some, in black even, I think on the Fashion Fabrics Club website (but I'm not positive about that).  I proceeded to cut everything out (well almost everything--I had to order another piece of the crinkle poly from Marcy Tilton in order to have enough for the hood, so that created some delay) and started to sew it up.  Then, I got to the point of needing to set the grommets for the drawstrings and I froze.  Now, I have set grommets before and had no problems, but the process always has the potential of going badly.  I was so worried about having the grommets not set properly and ruining my project, that I folded everything up and put it in the closet.  Fast forward to at least 18 months later, when autumn is quickly turning to winter, and I realize I just have to bite the bullet because I need a coat to wear.  So I finished it.  The grommets are not the best looking, but they are sturdily attached and the drawcord stops pretty much cover any ugliness in their application. The coat feels like it is going to be very warm, even warmer than my old green one.  I am very happy.  Here's a photo of the pattern cover:


Yes, it is very early 1990's styling, with the dropped shoulder and sleeves, but I actually like this in a coat, because it is easy to wear over bulky sweaters or work jackets.  And I love the upper and lower cargo pockets with the flaps!

Here's the finished product, front and back:


Oh, yes, I also lengthened the pattern by 8 inches because I like coverage over my upper legs when the cold is biting.  Here's a closer look at the upper body:


And the oversized 1990's sleeve:


The lining:


And, finally, a detail of the sleeve cuff.  This pattern has an interesting sleeve placket design which results in a kind of flange behind the placket that encloses the opening to keep out snow and rain.  It works nicely.


I'm very happy to finally have this project done and I know I am going to enjoy wearing this jacket.

My sewing mojo has been really revved up lately, so I have several new garments completed that I am excited to blog about.  New entries coming shortly, I hope!